Introduction
In this article, we’ll explore how to create a lightning-fast portfolio using Astro with the Portfolio theme and then deploy it effortlessly using Netlify. With this powerful combination, you can quickly get your portfolio up and running to impress potential clients and employers.
What is Astro?
Astro is a modern static site generator that combines the best features of traditional static site generators with the power of contemporary frameworks. Its unique approach compiles your website into a fully optimized JavaScript application, resulting in exceptional performance and a seamless user experience. Additionally, Astro supports popular frameworks like React, Vue, and Svelte, allowing developers to create complex web applications with ease.
Introducing the Portfolio Theme
This theme includes essential features such as project sections. It provides an excellent foundation for you to showcase your work and achievements effectively.
Getting Started with Astro and the Portfolio Theme
Follow these steps to create your fast portfolio using Astro and the Portfolio theme:
Step 1: Set up your development environment
Ensure you have Node.js and npm installed on your system. You can check their presence by running the following commands in your terminal:
node -v
npm -v
Step 2: Create a new Astro project with template portfolio
Open your terminal and create a new Astro project by running the following commands:
npm create astro@latest -- --template portfolioStep 3: Customize your portfolio
Replace the default content in the src directory with your own projects, images, and information. You can easily modify the Portfolio theme’s components and layouts to match your style and preferences.
Step 4: Test your portfolio locally
To view your portfolio locally, run the development server:
npm run devYour portfolio should now be accessible at http://localhost:3000.
Deploying with Netlify
Netlify makes the deployment process incredibly simple, providing a seamless experience for deploying static sites. Follow these steps to deploy your Astro-powered portfolio with Netlify:
Step 1: Create a Netlify account
If you don’t already have one, sign up for a free account on Netlify at netlify.com.
Step 2: Install Netlify CLI
Install the Netlify CLI globally on your machine to interact with Netlify from the command line:
npm install netlify-cli -gStep 3: Build your portfolio
Before deploying, build your Astro project to generate the optimized files:
npm run buildStep 4: Deploy to Netlify
Navigate to your project directory in the terminal and run:
netlify initFollow the prompts to link your Netlify account and select the project you want to deploy.
Step 5: Deploy your portfolio
Finally, deploy your portfolio with the following command:
netlify deploy --prodYour portfolio will be automatically deployed to Netlify, and you will receive a unique URL where your blazing-fast portfolio can be accessed by anyone, anywhere.
Conclusion
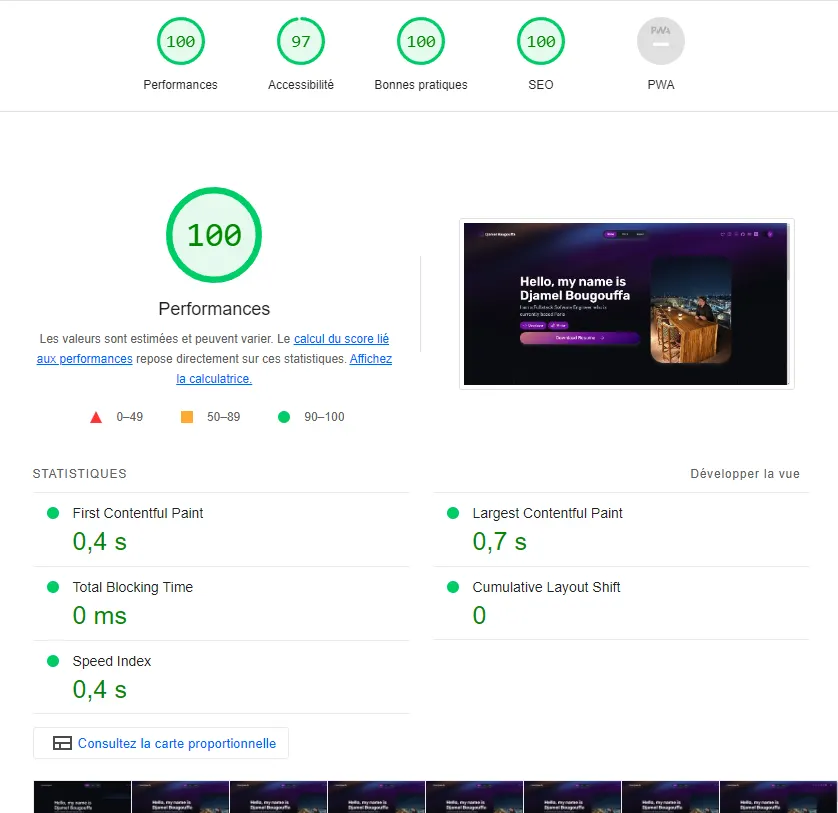
Creating a fast and impressive portfolio has never been easier with Astro and the Portfolio theme. Astro’s performance-oriented approach and seamless integration with modern frameworks allow you to build a top-tier portfolio effortlessly. Additionally, deploying your portfolio with Netlify ensures that it is accessible to the world with just a few clicks. So, why wait? Create your dazzling portfolio with Astro and the Portfolio theme and showcase your skills to the global tech community today!